

If you don’t wear ties regularly, it may seem like an extra skill. You probably keep searching for how to tie a tie on search engines, but does that really help? There are many methods available, and you may get stuck trying to decide which one to follow. VedVed will teach you easier ways to tie a tie, so you won’t have to rely on other wedding guests or Google.
Different Ways to Tie a Tie: 5 Easy Knots with Step-by-Step Instructions
There are hundreds of different ways to tie a tie. Styles, formality, and difficulty may vary. Further, we will break down the methods that can help you to tie a tie easily. We will guide you through a step-by-step process.
1. How to Tie a Four-in-Hand Knot
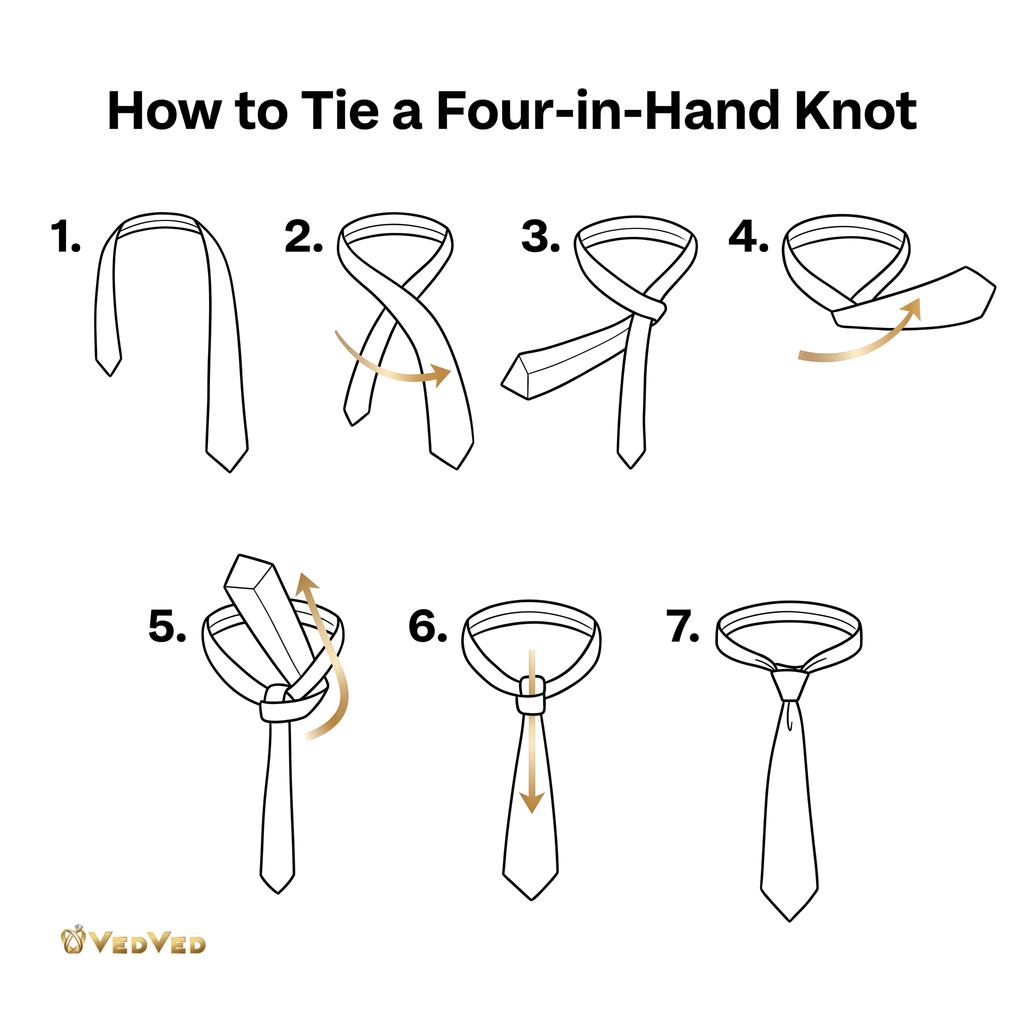
The four-in-hand knot works well with wide ties made from heavy fabrics. This is the most popular method for tying a tie because of its simplicity. Let’s learn it with a few simple steps.
- First of all, raise your shirt’s collar and drape the tie around your neck. The wide end must be at the right side, extending around 12 inches.
- Hold the wide part and bring it across the narrow one.
- Then, bring the wide end under the small end.
- Next, bring the wide end back over the top of the small end. Across the front to the left.
- Bring the wide side up in the loop from underneath.
- Take it down through the loop you just made. Insert the wide end downward.
- Hold the bottom part of the tie with one hand and tighten the wide end by pulling it down. Slide the knot upward and adjust for a neat finish.
2. How to Tie A Pratt Knot
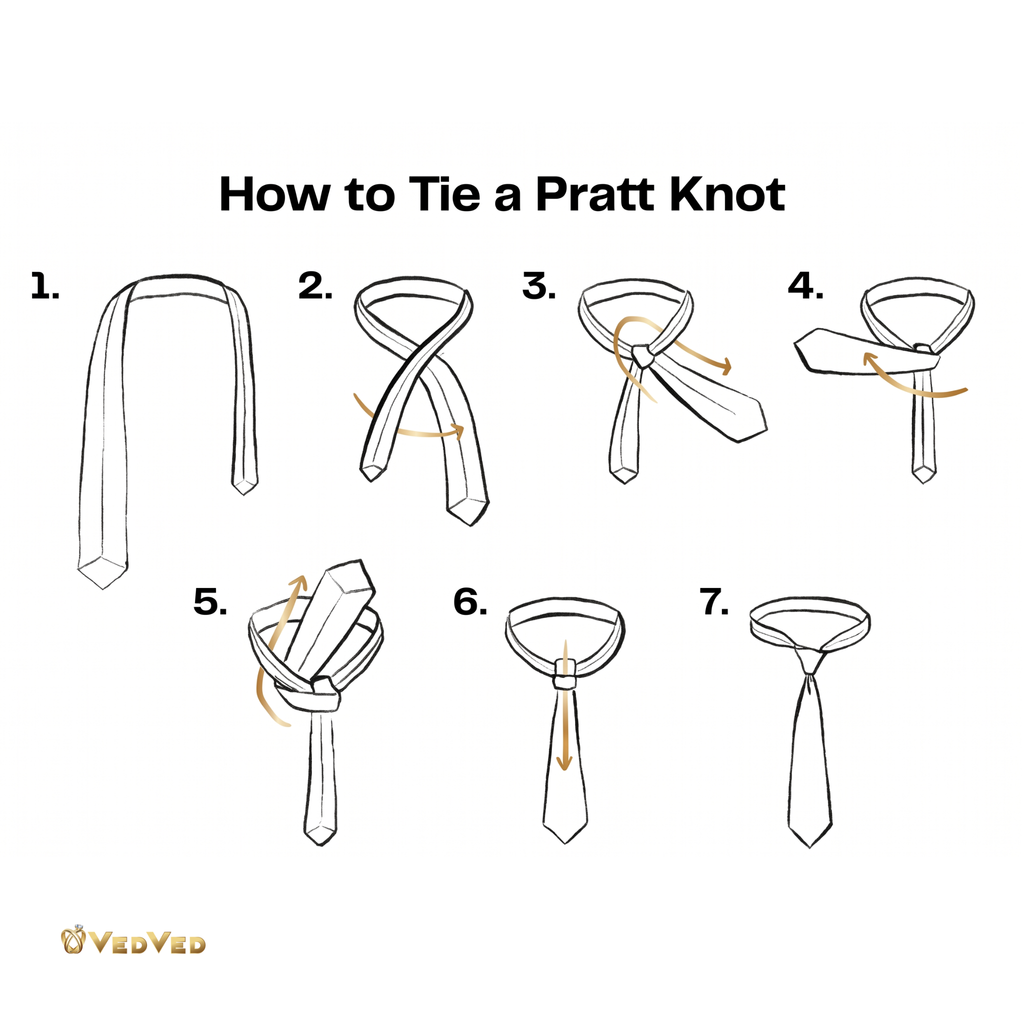
One of the easiest tie knots, also named the Shelby knot. It works for lightweight to medium-weight ties.
- To start tying the Pratt knot, begin with the backside of your tie facing forward. Keep the wide end at the right and the small at the left. The tip of the small end should be slightly above the belly button. You will only move the active end.
- Cross the wide part under the narrow end.
- Bring it up to the center toward the loop, through the opening at the neck. Then tighten it.
- Cross the wide end to the right, with the correct side facing out.
- Bring the wide end through the neck loop, across the small end, then loop it and pull it up.
- Bring it down through the loop you created.
- Pull down the wide end, slide the knot up, and adjust to the collar, and the process is complete.
3. How to Tie a Kelvin Knot
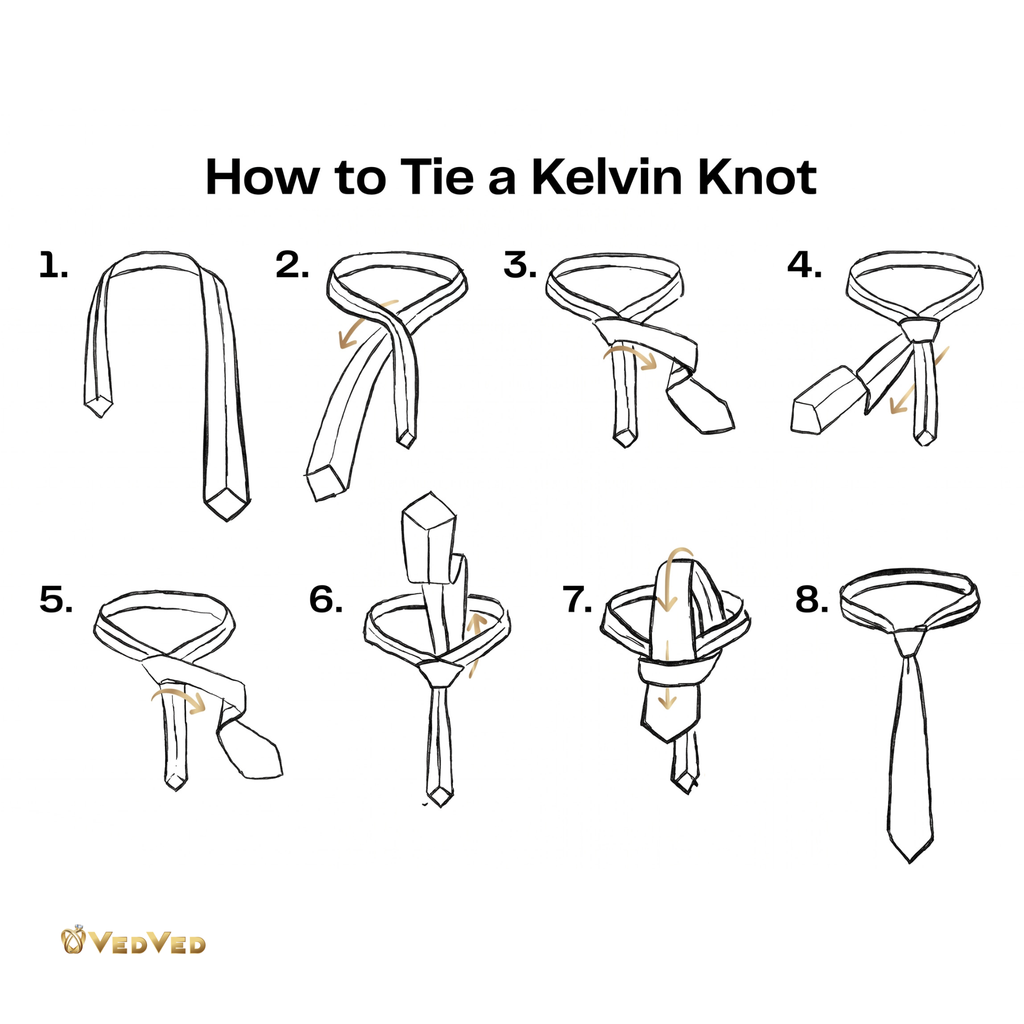
The Kelvin knot is small and neat, with a slightly fuller shape than the Four-in-Hand. They look polished and even.
- Place the tie around your neck, seam facing out. Keep the wide end on your right and the narrow end just above your belly button.
- Cross the wide end under the narrow end toward your left.
- Bring it across the front toward your right.
- Pass it behind the narrow end toward your left again.
- Bring it across the front toward your right. Keep this front loop loose.
- Pull the wide end up through the neck loop, then down through the loose front loop.
- Pull gently to tighten. Hold the narrow end and slide the knot up to your collar.
4. Half-Windsor Knot
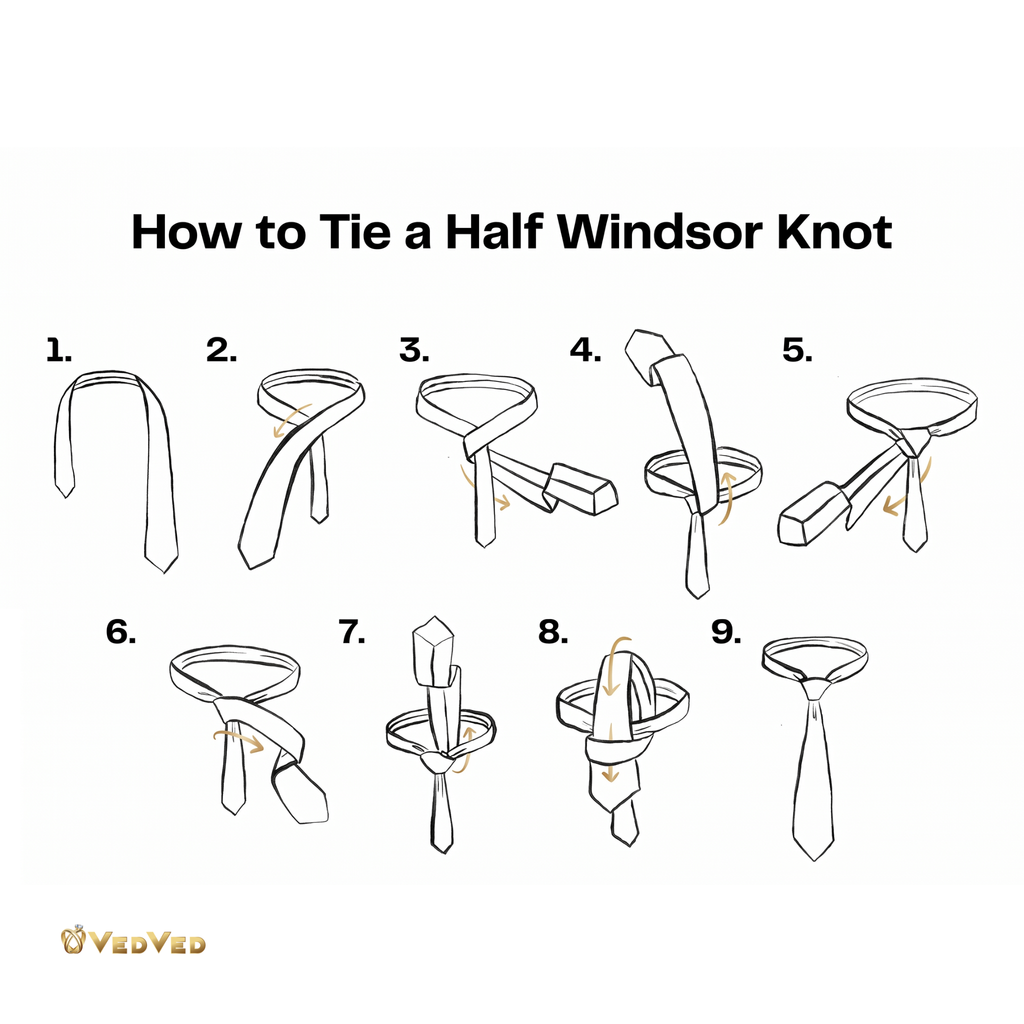
If you are keen to learn how to tie a tie with the half Windsor knot, follow this process. The Half Windsor makes a medium-sized triangle. It is smaller than the Full Windsor and works well with light to medium-weight ties.
- Lift your collar. Place the tie around your neck, smooth side out, with the wide end on your right, about 12 inches lower than the narrow end.
- Cross the wide end over the narrow end toward your left.
- Pass it behind the narrow end toward your right.
- Lift it toward your chin, then pass it down through the neck loop toward your left.
- Bring it across the front toward your right. Leave this front loop loose.
- Pull the wide end up through the neck loop from below.
- Pass it down through the loose front loop.
- Pull gently to tighten. Hold the narrow end and slide the knot up to your neck.
- Straighten the knot and fold your collar down.
5. How to tie a Full-Windsor knot
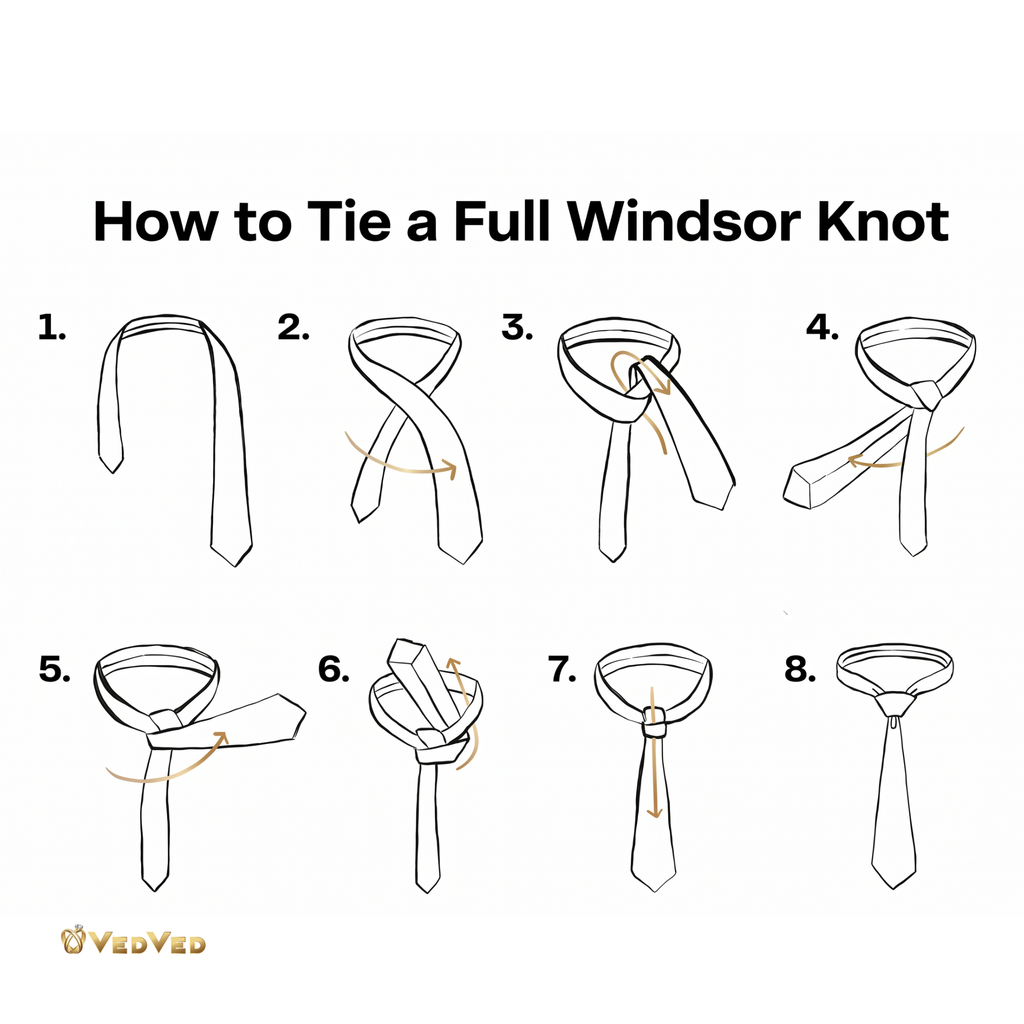
The Full Windsor makes a wide, even triangle. It fits well with a spread-collar shirt and suits weddings and other formal events.
- Lift your collar. Place the tie around your neck and smooth it out. Keep the wide end on your right, about 12 inches lower than the narrow end.
- Cross the wide end over the narrow end toward your left.
- Bring it up through the neck loop from below, then down toward your left.
- Pass it behind the narrow end toward your right.
- Lift it toward your chin, then pass it down through the neck loop toward your right.
- Bring it across the front toward your left. Leave this front loop loose.
- Pull it up through the neck loop from below, then down through the front loop.
- Pull gently to tighten. Hold the narrow end, slide the knot up, and fold your collar down.
Get Wedding-Ready with a Little Practice
Learning how to tie a tie is easier when you practice before you need to leave. Pick one knot, try it with your wedding outfit, and check the length in the mirror. At VedVed, we help you prepare for the little details that make celebrating feel more relaxed.
You can also check out our guide to “Best Celebrity Couple Halloween Costumes to Inspire Your Look“
Frequently Asked Questions About How to Tie a Tie
Q1. What are the techniques for the easiest tie knots for beginners?
A1. The Four-in-Hand and Pratt are good starting points. Both use a short sequence of steps, so practice either one a few times before the wedding.
Q2. Should I choose a Half Windsor or Full Windsor knot?
A2. Choose a Half Windsor for a medium-sized knot or a Full Windsor for a wider, fuller triangle. Consider your collar, too; a spread collar gives a larger knot more room.
Q3. Why does my tie end up too short?
A3. You may be starting with too little length on the wide end. Undo the knot, let the wide end hang lower, and try again. Aim for the finished tip to reach your waistband.


[…] How to Tie a Tie: Easy Knots Every Wedding Guest Should Know […]